Great 3-day weekend. Played with my kids, picnicked with neighbors. It’s amazing how much easier it is to enjoy the weekend with this new job compared to working for an early stage startup.
Lots to catch up on today. Feeling a little overwhelmed again.
Over the weekend I read some more about ADD and considered a few different things to try.
What about a standing desk? Hmm might need to do some business expenses at the end of the year. Wait… is my LG 5K actually VESA mount compatible? Is the built-in stand tall enough for standing desk configuration?
9:03 AM
I’m very interested in Watermelon DB. I actually tried using Nozbe (they own this github repo) as my task manager like 10 years ago. It was very powerful.
So it’s a database for making react-native apps fast that would be slowed down by loading and unloading large persisted caches into Redux stores. Multi-threading, native threads, indexing. What is it using for it’s DB on native? On the web it can use Loki.js.
Is the app I’m building really a offline-first app?
Watermelon does not really take care of syncing. Wait they have flow types? Not typescript? Wat?
So if we want to build the app with strong offline support we need to consider if it needs a full offline database? Doe the use-cases support that? Does data get created and updated on the mobile client that will then be synced to the back-end eventually? And I know we have sync endpoints for reading data but do we have endpoints for bulk updating data that was changed locally?
Checked into PouchDB years ago. I don’t think Couch DB on the server is a viable option for this app. It’s not a great, or feature-full production app database.
11:21 AM
Having trouble caring about work at the moment.
2:12 PM
Looking up information about OAuth and react-native.
2:52 PM
Thinking about digital nomad life in Costa Rica. Apparently cost of living isn’t actually that low any more. New digital nomad visa doesn’t really apply since I would be spending less than 6 months anyway.
Read some more of that book last night. Still not sure what to do about everything.
8:54 AM
Calling the doctor now just to see if my old prescription helps out at all again. One of the problems with medication is that I don’t know if it really works if I skip so many days. I often skip taking any prescription about 1/3 of the days of the week. Consistent habits are not easy for me.
9:05 AM
OK, only on hold for 5 minutes that time. Got things sorted out.
Mapbox in react isn’t rendering the base-map tiles. It seems like maybe I’m getting some sort of authentication error using the mapbox api. I’m gonna drop this customized map component and just use the base library components.
11:21 AM
Success! Got the react native app to render a map with the same large GeoJSON object in a webview and compare it with a map rendered a native map component.
I would say, that on my iPhone SE2 from 2020, the interactions is roughly equally good. The line drawing isn’t as clear in web-view as in the native component.
I should try to compare raster tile layer performance too.
12:57 PM
Doing some planning for a hackathon in 2 weeks. Gotta figure out the scope of what we will tackle. I’ve done a lot of miro planning for this developer portal already, but don’t want to overwhelm people with everything in my mind. I tend to run on ahead and then I expect people to get annoyed if I’ve thought too far ahead of where we are at in a project — this might be one of those strengths of ADD that I need to learn to capture and not be ashamed of.
1:01 PM
My wife brought me a salad for lunch. Thank you dear.
2:21 PM
Great conversations about frontend architecture. On the surface we were talking about shared state management and offline syncing functionality. One of the classic hard problems is cache invalidation. But more deeply the question came up, how do I help other frontend developers communicate and listen to the other devs that rely on their expertise. What is the wedge that’s drving these developers apart. How do we improve our listening and empathy as an organization…
I have some meetings today. I have a call with a client about design work at the end of the day. I still need to call my doctor. I still need to test out a webview in a react native app. Writing these posts is like journaling during the day.
Last night I checked out a book from the libarary about ADHD. I feel like I need to take this seriously and start really paying attention to this side of myself — not just be embarassed and ashamed because of the stigma around having a “disorder”. I could find coping mechanisms and look for opportunities to use my strengths, but I have a deep-seated belief that ADD makes me a bad worker, and it will get me fired.
9:54 AM
Great meeting about our big project, it kept me engaged with problem solving. Now, I think I’m going to try to load the web view in the mobile app like I started yesterday.
10:02 AM
My iPhone doesn’t have VPN access to the necessary dev servers. Need to run the web application container locally so I can do a real tests.
Trying to make some progress. Discovering lots of little issues with the container react application. Like some bizarre browser detection feature.
I mean this works… technically. So can I get a mapbox map to show up here? If I can get the same map and data to render in both ways then this test will be done.
3:25 PM
I had another good meeting. I like filling up my day with meetings like that, I feel productive despite myself when I can help make decisions and discuss problems. Now it’s time for a little design meeting with my longest-running freelance client. We manage to do some good design work, and it’s almost all on the phone while I work in figma and he watches me. Some designers would probably lose their minds. I feel really proud of the work we did to re-design hundreds of screens of functionality over the last couple of years.
5:24 PM
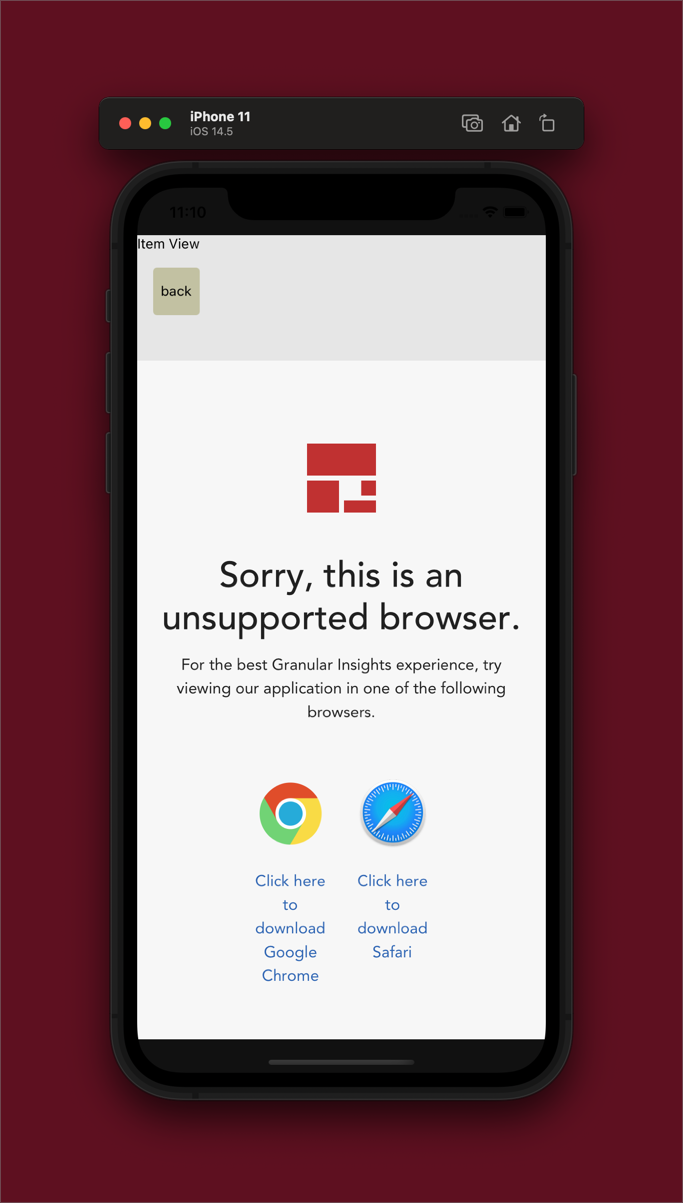
Did some good work today. Did not call my doctor. Took a short nap over lunch. I never got past that stupid unsupported browser warning. So I’m going to have to yank all of the features out of this web app and just make a really minimal reproduction app that doesn’t have any of the login stuff in it tomorrow. And then I need to figure out some good answers about offline sync options.
I want to put my effort and focus into my job. I’m finding it difficult lately. For various reasons I’m not feeling very productive, seeing a decreased amount of focus during the day. Yesterday I was able to focus for a few meetings, but the rest of the day I was distracted constantly. Then about 4:30 I felt the energy drain out and my mind felt fuzzy and I was suddenly able to focus. 45 minutes of productivity per day is not enough.
The honesty is difficult. This blog has not been about things like this in a long time. I don’t like the idea of publishing these thoughts forever, they are pretty cringe. At the same time I’ve been watching youtube channels where people do fun projects and also just show the real side of themselves. I don’t think I can do video right now, but I can write and publish a blog. And it might help me when I feel like I need to just get some of the thoughts out of my head. ADHD is difficult to manage and having a place to pour some thoughts out might help.
So that’s this post: a log of my thoughts and accomplishments from one day. An account of what I’m doing to deal with various challenges and tasks.
Today I plan to do the following:
Have several short meetings about current projects.
Edit and Post this file at the end of the day.
Call and set up a Doctor’s appointment.
Create a react-native test application with an embedded webview that can load with injected authentication tokens.
This file will be updated as I proceed.
9:16 AM
Just wrote the above. Listening to Pandora station “Tiësto Radio”.
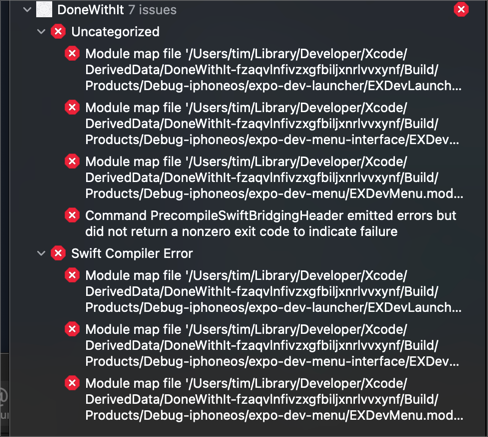
Installed https://github.com/react-native-webview/react-native-webview in my test project. It’s an expo app. Something weird happened to my project. The start script changed form expo start to react-native start. When I run react-native run-ios it starts up a very slow xcode build process.
I have about 1 hour until my first meeting of the day.
9:29 AM
I did somehow get the simulator to open my project.
expo start --dev-client then click the link in the web UI “Run on iOS Simulator” whick opens a custom URL scheme link on the device.
It shows the app with custom native code inside it. Now can I get it to run on my actual device?
I want to skip the EAS build service for now. Can I just use the built in Apple tools? Plug in my iphone with USB. Launch XCode. Apple Docs. Add my work apple id to the accounts preferences in XCode. Change the project settings the associate with my work team for apple developer program membership.
Receive error in XCode:
1
2
Failed to register bundle identifier
The app identifier "com.timbly.donewithit" cannot be registered to your development team because it is not available. Change your bundle identifier to a unique string to try again.
Wat? Go make some more coffee. Just opened a new bag of “Late Night” from Methodical Coffee. Dark roast provided by bottomless.
9:54 AM
Worrying about tornadoes.
9:58 AM
If the proof of concept app doesn’t run on an actual device it doesn’t count as working in my mind. It’s important to carry test projects through the lenght of the development cycle. We call them tracer bullets sometimes. There’s not a lot of meat on the bones, but the project needs to traverse the full length of the process to find any gotchas.
Changing the bundle identifier to something else fixed the error in xcode, because I created the project and gave it a bundle identifier before I added my new apple ID that’s associated with a developer account.
Error: EMFILE: too many open files, watch at FSEvent.FSWatcher._handle.onchange (internal/fs/watchers.js:123:28) Emitted 'error' event at: at NodeWatcher.checkedEmitError (/Users/tim/Sites/expo/DoneWithIt/node_modules/sane/src/node_watcher.js:143:12) at FSWatcher.emit (events.js:182:13) at FSEvent.FSWatcher._handle.onchange (internal/fs/watchers.js:129:12) + [[ true != true ]] Welcome to React Native! Learn once, write anywhere
Error: EMFILE: too many open files, watch at FSEvent.FSWatcher._handle.onchange (node:internal/fs/watchers:204:21) Emitted 'error' event on NodeWatcher instance at: at NodeWatcher.checkedEmitError (/Users/tim/Sites/expo/DoneWithIt/node_modules/sane/src/node_watcher.js:143:12) at FSWatcher.emit (node:events:394:28) at FSEvent.FSWatcher._handle.onchange (node:internal/fs/watchers:210:12) { errno: -24, syscall: 'watch', code: 'EMFILE', filename: null } Command PhaseScriptExecution failed with a nonzero exit code
Requires XCode command line tools. Attempting xcode-select --install
11:26 AM
Two meetings. Need a break. Time to make some lunch and then watch some youtube.
12:00 PM
I had a confusing meeting that was full of information that I don’t know what to do with it. I have enough to keep me busy this is a confusing thing to try to figure out.
12:21 PM
I feel so lazy. I can’t do anything.
YouTube is stupid. There’s nothing on there. I don’t want to play games.
Time to call that doctor.
Reinstalling watchman again while on hold.
It’s weird that macOS is version 11 now. It’s been OS X v 10.x for almost 20 years.
3:38 PM
Got sick while on hold. Really sick to my stomach. Had to lay down. Took a long nap. I feel like a failure. Back up and trying again. OK, let’s see if the stupid project will build again.
3:43 PM
OK the development app started on my iPhone but I can’t get it to connect to my launcher.
3:50 PM
OK, got it figured out. It seems to be just my laptop’s IP address and port 8081. And it reloads when I change my JS. Now I can start testing it for real on a real device. Success!
I have to admit that frontend testing is not my favorite thing to spend time on. Frontend tests tend to be fragile and tightly-coupled to non-functional aspects of the code like text labels and classnames. I prefer to write tests for pure functions that calculate or transform data in somewhat complex ways, and most of this happens on the backend. I fully expect developers to write tests for their backend API code, even to the level of testing that ORM models and SQL scripts work as expected.
But still I can’t leave the testing story where I did in the previous post about developing with estrella and es-build. Basically I just left mocha and ts-node as the solution in my sample project. But that’s not a great answer. I have seen that it is a fairly slow and heavy combination of tools. The popular alternative of Jest, Babel and Enzyme may not be fast enough for everyone either.
So I took my philosophy to creating a custom dev and production build script and applied it to the test script. The first step was to identify the minimal testing solution for my needs. Research revealed a new JS testing tool released last year called Baretest.
Minimalism (or when and why to reach for something weird)
Sometimes complex tools are complex for good reasons. Even if I don’t agree with all of the design decisions, I think the React team has built a VDOM library that is going to be the standard for building web applications for a long time to come. React is not minimal like preact – or a dozen other minimal alternatives – but, it creates an abstraction layer that is widely learned and used by many developers. Conceptually very similar to JQuery back in the day, it’s just so widely known that it’s useful as a target for teams to standardize on.
Other times a tool is just the standard because of popularity and there’s room to build something tiny to replace it that meets just the requirements you have. For example React is good, but Create React App installs half of NPM when you start it up. Every dependency and line of code in the dependency is something that theoretically affects the code you have to ship and maintain, including your build-tools. When someone new joins the team, they will have to learn the tools you’ve chosen, so the tools should be small and easy to understand, with a minimum of “magic”.
Baretest is about 50 lines of code with one dependency. It will execute faster and with less overhead than Jest. Instead of babel and tsc we can use es-build, it is faster that babel to compile typescript and JSX into compatible standard JS. Source transpilation and test runner overhead are the two long poles I wanted to address in test startup time for my sample project. Once I’ve seen how small and simple a testing script can be, I will be better informed about reaching for a big library in the future.
Step 1: Write a test with baretest
Here’s my setup helper setup.ts file for creating a dom environment in Node.
To run the tests I create another file in the scripts/ directory that will get built once by es-build and then executed whenever I need to run my tests. This script is about 41 lines of code and 2 external dependencies (+2 transitive deps) to replace Jest (76 deps) and Babel (>15 deps [how to even count everything?]).
/* * Builds all src and test files then executes the tests whenever it finishes. * Watch mode is supported with -watch. */ !(asyncfunction () { awaitRimraf.sync(testOutputDir + "*"); const files = glob("src/**/*.ts*").concat(glob("tests/**/*.ts"));
// the es-build options we will apply to your typescript constbuildOpts: BuildConfig = { entry: files, outdir: testOutputDir, outbase: "./", format: "cjs", bundle: false, debug: true, sourcemap: true, minify: false, silent: true, tslint: "off", onEnd: startTests, }; awaitbuild(buildOpts); })();
/** * Spawns a node process to run the tests */ asyncfunctionstartTests() { console.log("🎸 Built Source Code"); const time = newDate().getTime(); const nodeTest = spawn(`${process.execPath}`, [`build/_tests/tests/test.js`]);
I added a couple different scripts to my package.json to make it easy, but I discovered that npm, pnpm, and yarn all add about .4 seconds of overhead to any script execution. So if you really want it to be fast then add executable permissions to your built file (chmod +x) and then run it directly in the terminal ./build/_scripts/test.js.
Here’s a typical run completing in less than 1 second, for example.
Step 3: Add live-watching.
1
./build/_script/test.js -watch
Sorry that was a trick, estrella gives us file watching and incremental builds as part of it’s built-in options – so any code changes are picked up and cause a rerun of tests within about 1 second. This is very powerful! Getting instant feedback on your changes is super helpful for speeding up development time and catching errors. It’s just as powerful as linting for improving code cleanliness. Your IDE probably takes almost a second to update the red squigglies on large JS file, so in theory we get feedback about the behavior and functionality of some of our code as quickly as possible! Now of course if your tests are integration tests they are going to be slower while they deal with more layers of the stack, but for simple unit tests this approach should be effective.
I recently dug into a new tool that I wanted to explore called es-build. It’s a super-fast typescript compiler and JS bundler that competes with babel, rollup and webpack in certain ways.
You point it at an entry-point file and tell it to bundle it up for the browser (or node) and it does the rest. It converts typescript out of the box, without relying on tsc. The developer’s benchmarks show es-build is many times faster compiling most projects.
I put es-build into a react webpack project with esbuild-loader and it was almost too easy. But it doesn’t support hot module replacement and it doesn’t appear to be on the roadmap.
I like webpack, I think it has a lot of powerful features and is the most robust tool to reach for when you’re building a large project. But, I enjoy playing around with other tools when I can. And I’ve been enjoying the process of building my own framework and toolchain to really understand what’s possible with frontend tools. I like the approach of imperative over declarative syntaxes. And webpack is very declarative most of the time. The mixing of declarative and imperative code in webpack configs is the reason it’s so powerful but it also confuses beginners.
So I set out to write a live dev server and production build script using typescript and no webpack. I still pulled some tools off the shelf and might switch some of them out as I continue to learn.
The first tool I found while researching was Estrella built by Rasmus Andersson – who’s kinda brilliant. It encourages a simple approach, it’s API is clear, and it reminds me of Gulp. If you want to understand what really happens when you run npm run dev then this approach will help with that. It takes away some of the magic. Of course abstractions are still useful, we don’t have to examine every part of the stack. But code is better for configuration on something that is so critical to getting work done and so often fails and stumbles in real-world scenarios. In my experience local dev environment setup is one of the biggest sources of confusion and frustration when new developers join the team. Too much magic gets in the way of learning and fixing your own code.
So when a user run’s npm run dev first we use es-build to build the dev.ts file, then we run it with a command line option of -watch.
I’m not bundling this build script because live-server is not happy with bundling, so we just set the format to CommonJS and let it run like a plain old node app. I’ll probably find an alternative to live-server eventually.
What’s first in the dev server? The same thing you would have in any script, a bunch of constants for configuration!
// for configuring this script's command line arguments, see also // https://github.com/rsms/estrella#your-build-script-becomes-a-cli-program const [opts] = cliopts.parse( ["p, production", "Creates a production build."], ["o, outdir", "Output directory, defaults to `build/`"], ["s, sourcedir", "Output directory, defaults to `src/`"], ["t, staticdir", "Static file directory, defaults to `static/`"] );
// set up all the directories we want to work in const src = subdir(opts.sourcedir || "src/"); const output = subdir(opts.outdir || "build/"); const staticDir = subdir(opts.staticdir || "static/"); const cssFilter = /\.css$/i;
// the es-build options we will apply to your typescript constbuildOpts: BuildConfig = { entry: src + "index.ts", outfile: output + "index.js", bundle: true, ...(opts.production ? { debug: false, sourcemap: false, minify: true } : { debug: true, sourcemap: true, minify: false }), };
I know this is a little silly, because I was just complaining about configuration, but some of this stuff is already properly abstracted, and the variable name’s meaning should be clear to developers.
I create a few helper functions then I start the actual build process.
// this can run in parallel with the rest of the build scandir(staticDir).then((files) => { console.log("🎸 Copy Static files"); files.map(copyToOutputFrom(staticDir)); });
Copying static files to the build directory is called out first. I make heavy use of promises because most javascript developers need to know how that works anyway, and it’s useful for this type of project.
After the static files I start dealing with CSS files. In my project I need to process my CSS files before I run my Typescript Build because otherwise type checking will fail. Normally es-build doesn’t even do type-checking but estrella starts up a tsc process to do that for us in parallel with the build process so we get feedback about type errors on the command line while the dev server is running.
The postcss pipeline is abstracted away and configured in it’s own file postcss.config[.prod].js and postcss uses the tailwind plugin which consumes tailwind.config.js. It’s a little frustrating to still have so many config files, but those tools normally configured in this way and all the documentation around tailwind will point developers towards those files anyway so I didn’t want to break existing mental models for those tools.
When I call the postcss command inside my helpers I pass a different set of plugins and options if it’s in production mode to purge the CSS files and minify them with cssnano.
After the CSS is ready we will run esbuild, start our live development server, and start watching for any file changes we care about.
/** * Build and Transpile Sources * Order of operations: * 1. Process CSS, * 2. In dev mode: start the server * 3. In dev mode: start watching for CSS file changes to rebuild them * 4. Build JS, */ scandir(src, cssFilter) .then((files) => { console.log( "🎸 Process CSS with Postcss and Frets Styles Generator", files ); returnPromise.all(files.map((file) =>processStylesheet(src + file))); }) .finally(() => { // Run es-build on our typescript source, watch mode is built in if (cliopts.watch) { console.log("🎸 Starting dev server."); liveServer.start({ port: process.env.PORT || 8181, root: output, }); console.log("🎸 Watching for file changes."); watch(src, { filter: cssFilter }, (changes) => { console.log("🎸 CSS File modified"); changes.map((c) => { if (c.type === "add" || c.type === "change") { processStylesheet(c.name); } }); }); } console.log("🎸 Build the JS"); returnbuild(buildOpts); });
What does this get us? A nice utility script inside the repo, that handles both dev and production build workflows in a way that is easy to modify and update for any developer that can ready JS already. It has far less magic than a webpack config, at the expense of being more verbose.
Where to go from here
I have considered putting all of the build and developer tool configuration in one big file with lots of comments… it would be an interesting experiment. We could bring everything to imperative run our whole developer tool-chain:
At Invisible we have a small but focused team of engineers that want to ship quickly. We are marching towards a goal of building a company and technology platform that can employ people everywhere in the world to do knowledge work at a fair wage. We manage complex project and operations teams with our custom tools, so we have a lot of software components that need to be developed and maintained.
We have adopted a monorepo structure for our platform so that everyone on the team remains in tight sync on what is happening around the different parts of the company. This also allows us to maintain some level of coupling between front-end and back-end services without creating multiple PRs on different repos. The unanticipated cost of the mono-repo for us was the time our CI pipeline took to run.
We were on CircleCI and had configured our CI test jobs to run all of the tests for every service in parallel every time we push code to a Pull Request. This configuration is perfect if you need to make sure that one service wont fail when another service or package changes. We treat our entire platform as one product, even though certain members of the team focus on just one part of the platform most of the time. But, our PR test runs were very slow, often over 20 minutes. This was happening because of several configuration choices we made early on, including running yarn install with lerna across every service and package up front then caching, which resulted in a 900 MB workspace cache file that needed to be downloaded for every successive step in the CI work-flow.
A slow test run time is annoying, but it became unbearable when we started insisting on a linear git history for our master branch. This setting means that every PR has to be re-based any time another PR is merged by someone else. Since we often have a dozen or more active PRs being worked on in one repository, this timer would have to re-start many times each day. Developers would make a change to code, see the test results come back, but the master branch had already been merged into by someone else. The owner of the PR would need to go back, re-base, force push, and start waiting for tests to finish all over again. Getting a feature to staging would often take an hour of sitting and waiting, and coordinating with other devs. Deploys to production often required manual intervention by a developer using a command line tool.
The core problem here is “tight coupling”. One team’s ability to ship is impacted by another person or team’s actions (merging first). Developers were prevented from finishing their work by circumstances outside of their control. With a structure like this, each developer we add would slow down every other person and team, that’s inverse efficiency scaling! Adding more people slows us all down! On the road to speed all instances of tight coupling between teams and services need to be eliminated.
This resulted in a very slow “cycle-time” — the time it takes to get from PR open to deployed in production. Every time a developer has to switch contexts and wait for an async process results in massive inefficiency.
We began outlining what we wanted to change about our CI configuration and created a goal of every CI test run being finished in less than 5 minutes. And every deployment script finishing in less than 5 minutes. Here’s how we configured our work-flows to do that.
We use path filtering in actions so that only the services that have changed actually run their unique tests.
We parallelized our runs so that multiple kinds of tests run at once.
We utilize small caches, unique to each service, instead of one big cache, so it can be downloaded and decompressed in seconds.
The only “global” tests are very short linting tests that don’t require as much installation and setup time.
We added a check to our back-end service that spots any breaking changes to our graphql schema and stops developers from shipping breaking changes, which helps eliminate another point of tight coupling between services.
After these changes our PR test suite runs between 1 and 4 minutes. All of this has significantly improved our cycle time. Everyone on the team can feel how much faster they are able to move with these shorter waits. We are also able to deploy more confidently because we know changes and fixes will be relatively quick and cheap to ship as well.
The switch from Circle to Github Actions will impact our bottom line as we will be using fewer minutes of compute time and we can use lower cost compute resources since each work-flow is doing less work. We can also take advantage of the 3000 minutes that are included with the Github pro team plan we were already paying for.
We are going to add a few more lint checks in the near future, and improve our automatic syncing of issue status in JIRA using these actions. I’m very excited about unblocking our engineering team to move faster. Instead of slowing down as we add more engineers, we can ensure each developer on the team is able to ship more often and more confidently.
The problems with design-code hand-off are still manifold. I’ve been doing this for like 20 years and the process of turning visual direction into interactive applications is still fraught. Here are a few hints and principles to help you understand where this problem space has evolved lately.
Use Figma, but it’s not magic. Figma is an excellent design tool that is more accessible to devs since it’s web-based and collaborative. Devs get better access to measurement tools, colors, and specific CSS values that can be forklifted into a component, but honestly that saves us 2—5 lines of code in the component implementation, so don’t get hung up on that.
Don’t try to keep your static designs perfectly up to date with the work that makes it into production. Design tools are best used for creating a point-in-time snapshot. That snapshot will be attached to a story, ticket or issue in the project management tool, directing what developers should be creating. If the first implementation was sloppy and rushed because of deadlines, then put another story in the next sprint and keep circling in on that perfection until the product manager tells you to stop.
Developers should not be allowed to push code to production without someone reviewing it for proper reuse of components and consistent usage of design token values instead of hard-coded colors, fonts and sizes.
The designer needs to start with a systems and tokens mindset. They have to create reusable symbols that stick to a strict set of font styles, and colors. These values need to be synced with the code component theme values constantly. Also, the designer should have symbolic representations in their design tool that closely match up with the components that the developers have created.
A documentation site or app for you system is nice, but quickly turns into so much useless static artifacts if it’s not tightly integrated with the code that runs in production. For this reason we use Docz to write markdown with lots of integrated live examples of everything the component API is capable of.
Having a designer that knows how to write CSS and HTML is incredibly valuable. Working in the correct medium of the web is a turbo-booster in making that transition from idea to implementation.
I still operate on both sides of this line, I produce designs for one team to implement in Figma, and have to answer their questions to give specific answers about all the details that a static image can’t cover. In my experience humility and agility are key in the design role.
I also create React components based on the work of designers in another team and manage a dev team that produces components in a design system. We have to deal with all the technical aspects of packaging up a library of reusable widgets, and maintaining them. I believe Organization and communication skills are key in the engineering management role.
I’ve been a fan of user-friendly user-configurable information management web apps for a long time. I love AirTable, I loved (the now defunct) FieldBook even more. I’ve enjoyed the power of Notion.so, Quip, Slab, and Confluence as team wikis and collaborative spaces. I wrote an article a while about about putting your design system in a wiki which was all about creating organization structures and page templates to make your team’s product design system great inside of a wiki - a tool that is simple for non-developers to use.
I am a developer, I do love putting design systems in code repositories like Fractal, Storybook, and UI Engine. But, I think there’s a place in modern product teams for an easy to edit document, bringing together multiple facets of designer’s and developer’s deliverables. I’ve observed teams using big, long Google Sheets to update the status of their design systems, each component getting a row and being updated to show progress in a central place. Well, I of course started thinking about other ways to organize that go beyond a spreadsheet. Project management tools like Trello and Pipefy are good for managing units of work as they move through various states in a process, so that seemed like a good option…
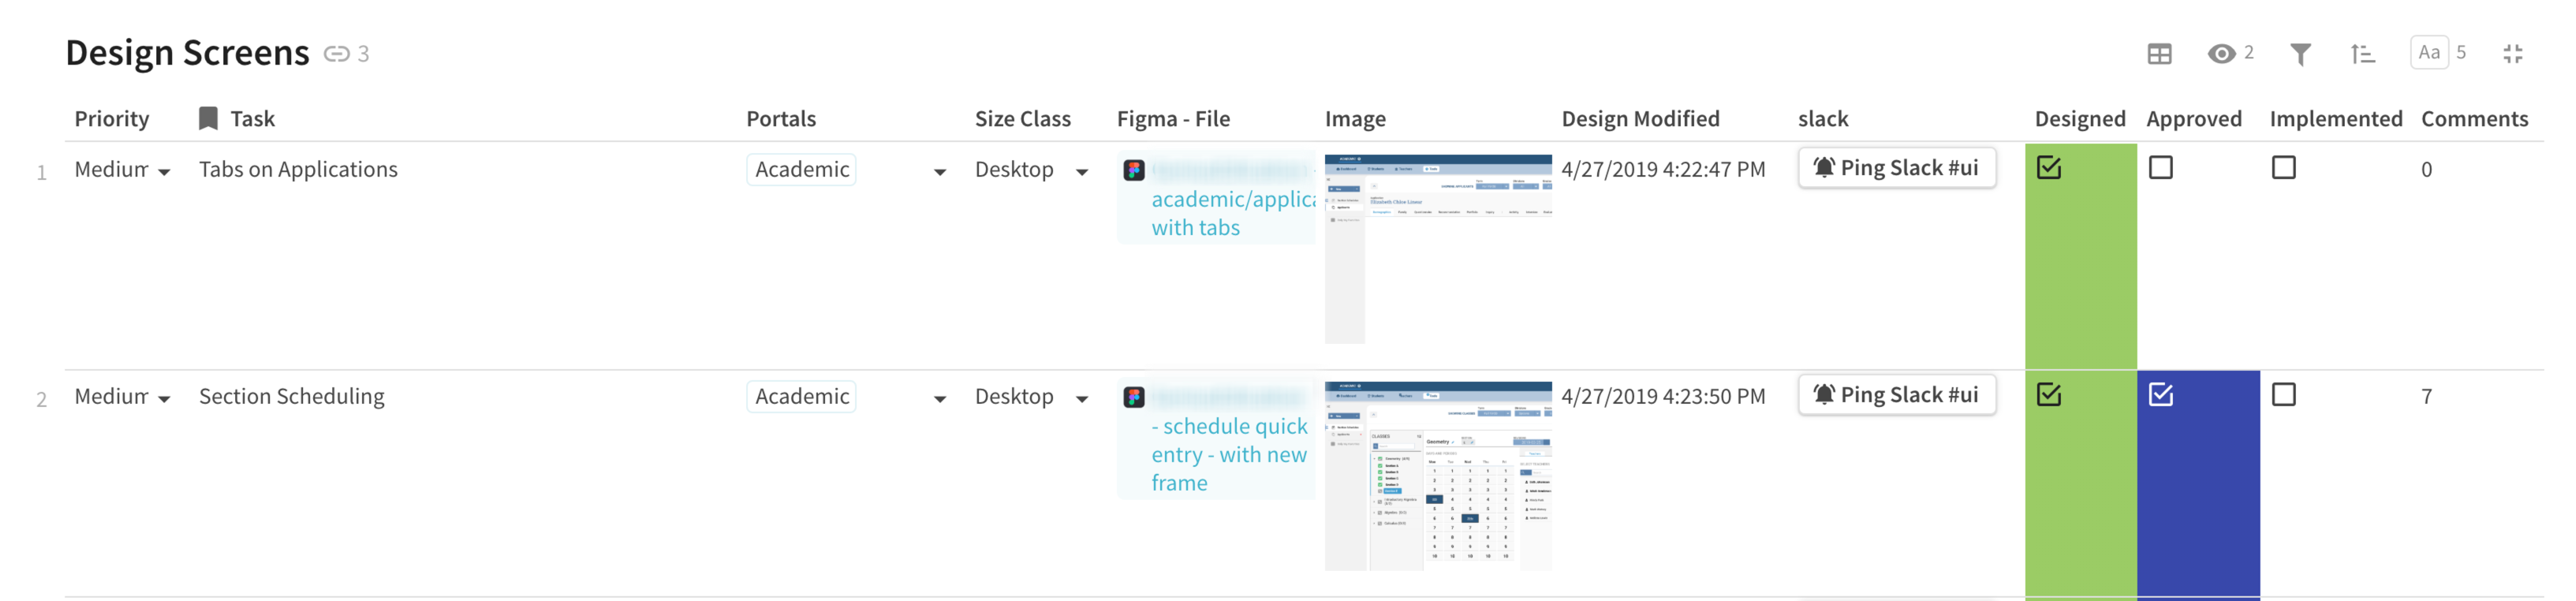
But, then I found Coda. It launched early this year and it’s pretty incredible. It starts with a basic collaborative text document but encourages you to start creating data tables (like Notion and AirTable have). But, the super-power of Coda is the presence of one very important integration, Figma. If you’re designing in Figma, then Coda is the perfect fit.
The Figma integration allows you to copy and paste a URL from the node of a figma document (using the browser not the desktop app) and paste that url into a special formula cell, which formats and displays a nice link with the name of the selected frame, along with a PNG snapshot of the frame as it looks currently. This means you can create a table that describes various components and screens in your application, track their status and see a nice little updated thumbnail right in the same row.
The Figma integration (Coda calls it’s integrations “packs”) also pulls in the last modified date of the frame as well as the number of comments on it in Figma. The other data checkboxes and dropdowns are all completely customizable for your purposes inside of the Coda table.
It’s possible to embed static designs from Sketch of course, but it’s not as full featured. Perhaps Sketch will be releasing web-facing APIs later this year.
There is another useful integration you might notice: that button in the screenshot that says “Ping Slack.” It will send a pre-formatted message to a specified channel with the relevant details about this design task. The button is disabled until a user marks the row as “Designed”.
Coda also has good integrations with Github, so if your development team is creating issues or Pull Requests that correlate with the design tasks, then those can be added as special links here as well, with columns that show summary data about the status of the issue or PR pulled from the the Github API.
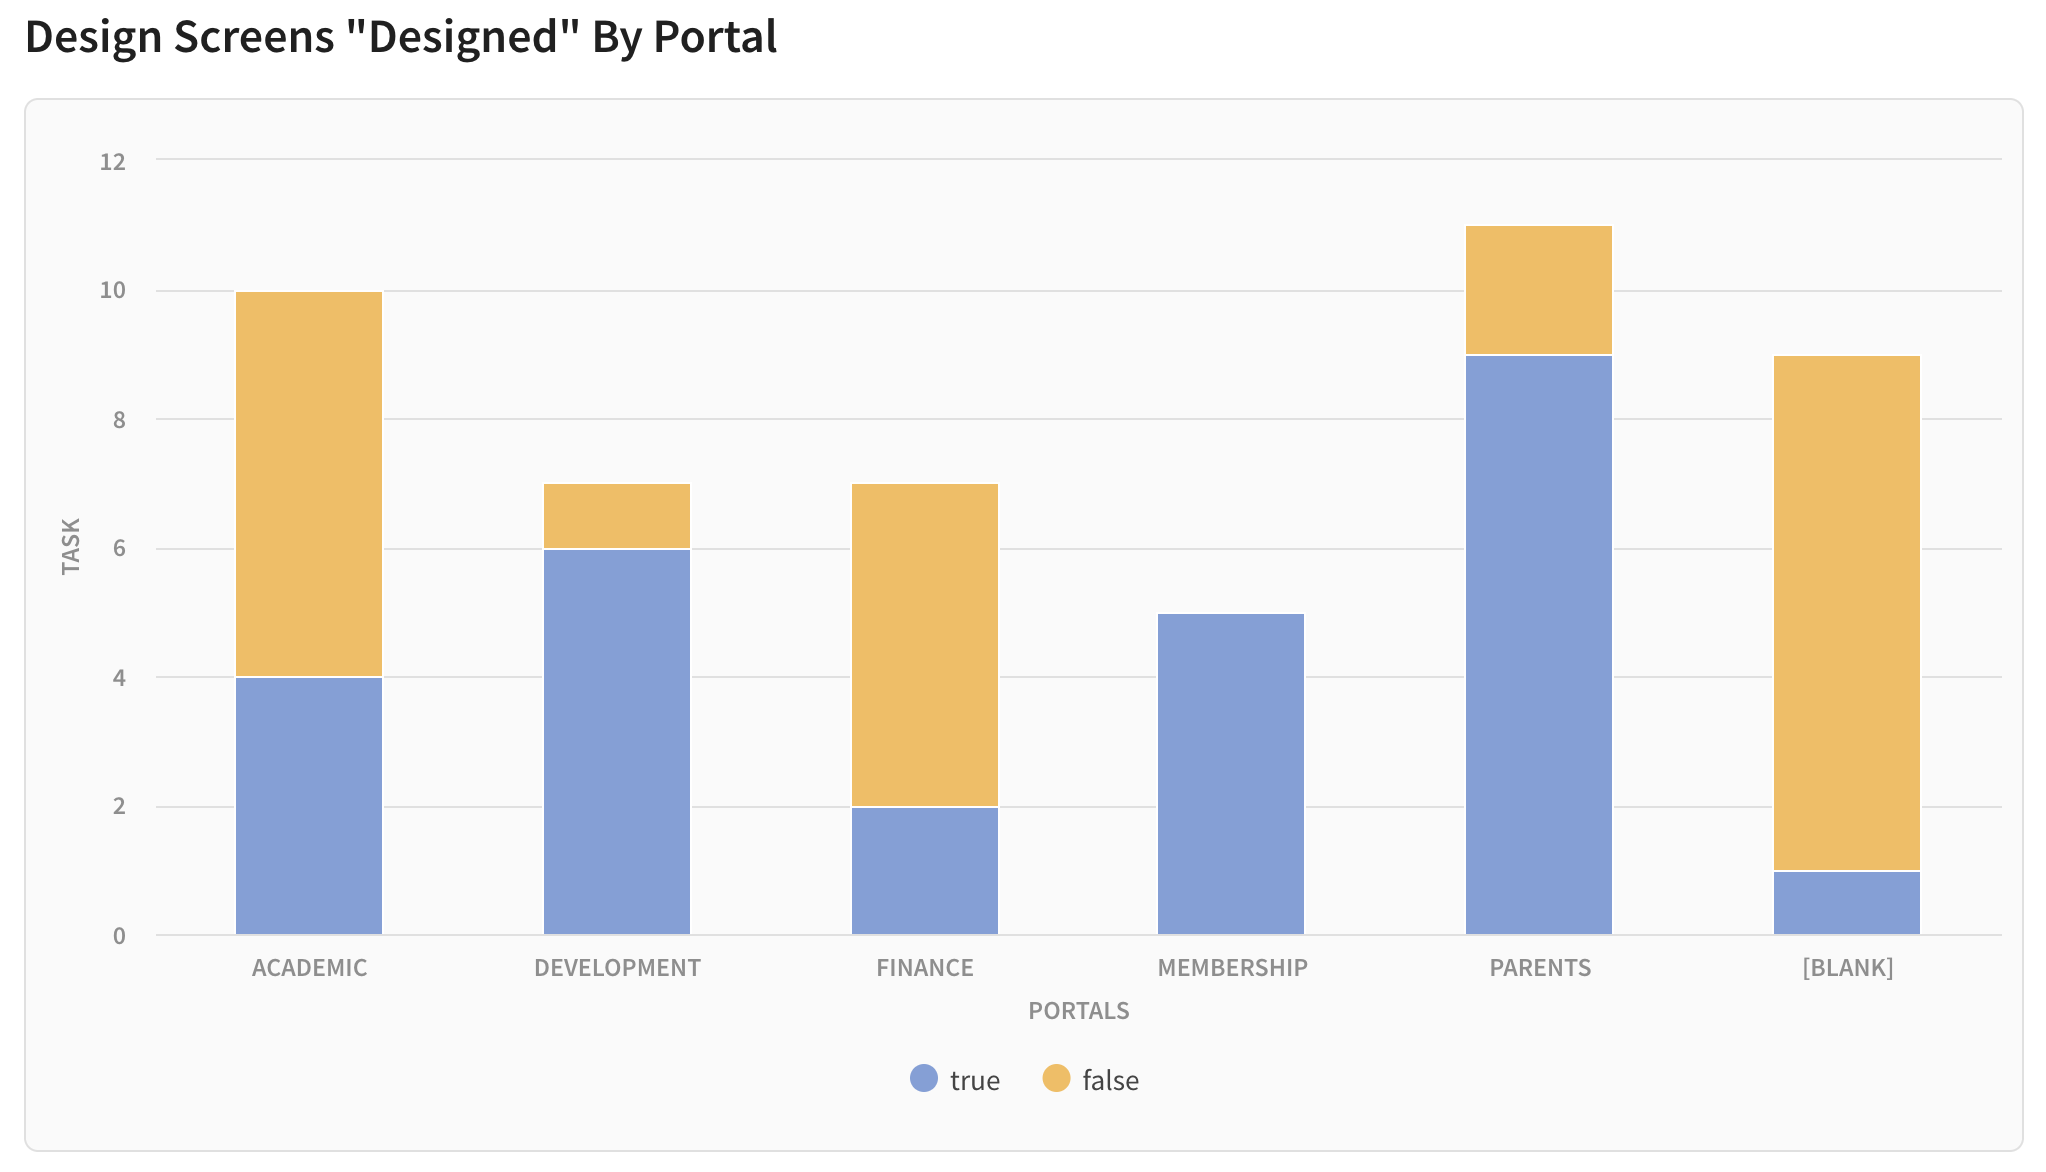
Each table in Coda is not isolated, it can be referenced from other tables, viewed in multiple different charts, and displayed in many formatted or grouped views of the same data. Each cell or row can have conditional formatting and you will find many of the same types of formulas you would in Excel.
The addition of the integrations with Slack, Figma and Github mean that you can finally bring things all together in one place. Figma bills itself as “the app other people use to build their own apps”. This seems true to me, it’s perfect for creating your own custom project management tool, research data tool, documentation tool, feedback gathering tool, and process collaboration tool. Each of these is possible if you just dig in and start building or look at their examples. If you’ve found yourself wishing that excel or google sheets could do more, this is for you.
The next part of a design system creation process is tracking the implementation by frontend developers in various platforms. Creating a table that summarizes all of the components you created in Figma is easy.
Then you can create a detailed page documenting the design and implementation details of each component, and link to it from the main table.
On this detailed screen you can embed long Gists of HTML, links to Github commits for the SCSS, Figma frames, or embed the Wireframes from Miro, or maybe add an example animation in a video. You could even link to the UX research tasks and survey results that you’ve gathered in other tables of the document. And, of course, it’s easy for anyone on the team to update this document. They don’t have to open a markdown file and learn git to commit it to a repo.
I see people asking about the limitations and advantages of various hosted design systems tools all the time, ZeroHeight, Invision, Zeplin, Abstract, etc. I think those tools are really interesting, but ultimately can’t stretch to fit every usage scenario. It’s possible what you really want is something more free-from, less prescriptive - something more collaborative for the whole company to own and use. I think it’s worth trying to put your design system in Coda… for my clients at Systematic UI, I’m already trying it out.
More about reduce and a few really helpful utility functions using reduce, so that you don’t need to reach for lodash every time.
Speaking of which, maybe this library of LINQ inspired functions could be useful. FromFrom is a nice chainable API for dealing with lists of stuff. Here is a great explanation of why their approach is interesting:
fromfrom uses the iteration protocols to iterate through the input data. All transformations create a new iterable that when iterated reads from the previous iterable, applies the transformation and then provides the output data. fromfrom works with any input data that implements the iterable protocol. From the built-in types for example Array, Set and Map implement the iteration protocols, but for example Objects do not. fromfrom provides its own iterable implementation for objects, so they can also be used as input data.
Hmm… guess I missed last week. Stress sunk it’s claws into me.
Sore back. I’m feeling so old. Did some babysitting. Grateful for a big blessing on our family.
Cleaned up inboxes and task lists.
Tuesday
Business development and networking.
Created a “hire-me” page which required further integration of the CMS on systematicui.com as well as creating a twitter card.
Wednesday
Can’t stop reading about inv.tech. What a fascinating company, so completely transparent.
Completely trapped by over a foot of snow. Winter is still here.
Thursday
So, I built an interesting script for generating a Nuxt website from a static HTML file. It’s not that hard but it is interesting. Nuxt will lose any static payload data once it’s done with hydration, assuming that you will make an API call after hydration. That’s a bit of a pain, so you have to write your dynamic generation-time data into a JSON file and then embed it in your output JS with webpack require() assignment.
Over the Weekend I spent quite a bit of time on a side project that could turn into a really interesting service. It’s a tool that’s useful for deploying and testing CSS design systems. Puppeteer + Docker + Node + Typescript + Mongo Stitch. Super exciting.
Monday
Played with my boys in the morning, enjoyed the sun and watched a small avalanche on the mountain nearby.
I’ve been writing docs, and came up with 12 Factors for Enterprise-Level Front-End Code Quality
I built a new project boilerplate for design system projects using Parcel for compilation, XO for Linting, even somehow managed to get TypeScript Support working.
Rebuilt a Nuxt 1.4 site in Nuxt 2.4. Figured out how to get ESLint working with that setup, and typescript again. What a pain. I never realized how easy TSLint was.